How to import contacts from a spreadsheet
ContactsLaw allows you to import contacts from a spreadsheet, as an alternative to manually creating large numbers of contacts where the details already exist in electronic form. This functionality is provided by the Microsoft Excel integration plug-in and is accessed via the Contact Import Wizard.
Spreadsheet requirements
Data must be in tabular form, with each row representing a contact to import (or 2 contacts; an individual and an entity) and details arranged into columns.
At minimum, the spreadsheet must contain the name of each contact and enough information to identify whether it is an individual or an entity. (If all contacts are of the same type, only the name is required)
Individual's names must either be broken into separate columns for first, middle and last names - or - expressed as a full name (First Middle Last) or filing name (Last, First Middle).
Addresses can either be broken into separate columns (street, suburb, state, postcode) or expressed in the same single-line form as appears in ContactsLaw. The former is preferred in order to avoid parsing errors.
The spreadsheet must not contain more than 3 addresses, 3 telephone numbers, 3 fax numbers, 3 e-mail addresses and 3 web addresses.
No column may contain more than a single piece of information about a contact, except
tags.
An example spreadsheet is shown below, and is used as the basis for the remainder of this guide:
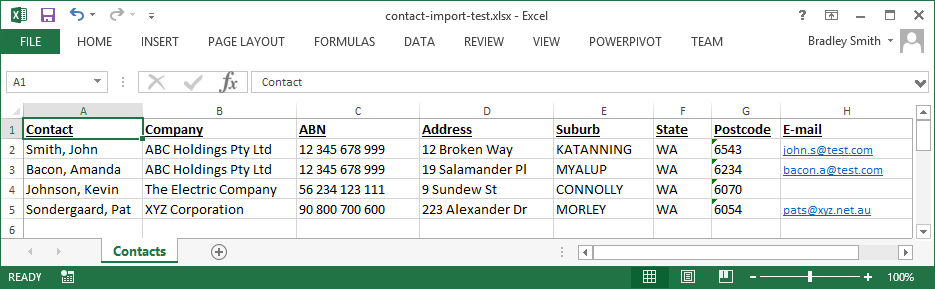
In this example, all contacts are individuals with an associated entity. Only the 'Contact' column is mandatory; all other columns may contain empty cells.
Starting the import process
To begin, open the Contact Import Wizard from the Create ribbon or Search window.
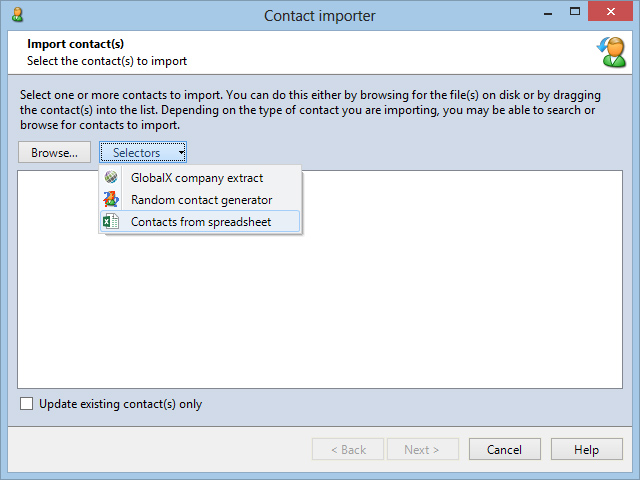
Expand the Selectors menu and choose 'Contacts from spreadsheet'.
Select the spreadsheet containing the contacts you wish to import. The following formats are supported:
Excel Workbook/Worksheet (XLS/XLSX)
Comma Separated Values (CSV)
HTML* Document (HTM/HTML)
* When using HTML format, each table within the document is converted into a separate sheet in the workbook. Documents of this type should only be used if they contain clean, well-formed data.
Mapping columns onto ContactsLaw fields
The next step of the import process is to instruct ContactsLaw how it should interpret the data in the spreadsheet.
You begin by selecting the worksheet and a range of cells. If the spreadsheet has no column headings and the values begin at cell A1, select 'entire worksheet area'. If there are column headings in the first row (i.e. the values begin at A2), select 'everything except top row'. Otherwise, enter a custom range.
Using a method similar to that used with document templates in ContactsLaw, a list of available fields appears on the right-hand side of the screen, which can be dragged onto the grid to associate them with a column in the spreadsheet.
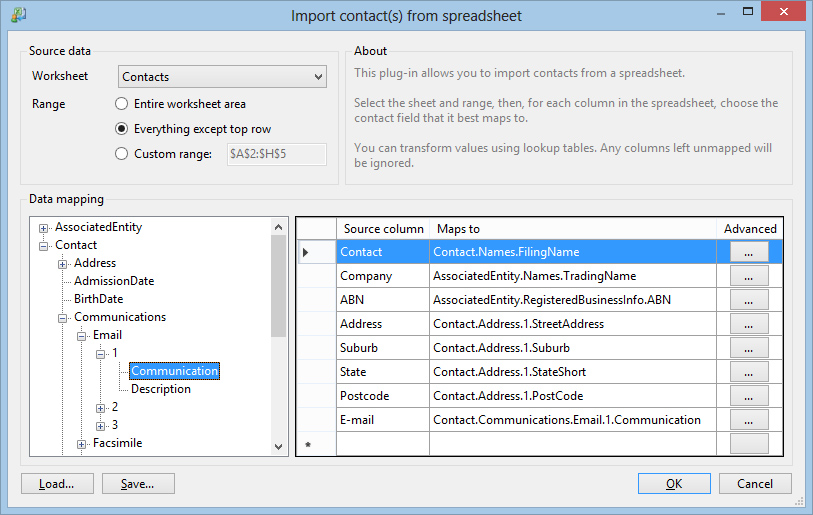
The fields are grouped under 2 main headings; 'Contact' contains fields for the main contact being imported and 'AssociatedEntity' contains fields for the associated entity contact (only valid if the main contact is an individual).
Within the 'Address' and 'Communications' headings, you can choose up to 3 different entries to populate (e.g. if 2 telephone numbers are listed for each contact).
Tooltips are displayed when hovering the mouse pointer over each field.
Advanced features
If the values in a particular column are not expressed in a form which is acceptable by ContactsLaw, you can use the 'Advanced' button to create a look-up table. The first column contains values in the column and the second contains the corresponding values to populate the contact with.

In the above example, several values that may appear in the spreadsheet column are mapped onto 'Individual' or 'Entity', which ContactsLaw recognises as valid contact types. The use of the asterisk (*) is a 'catch-all' indicating that any unmatched values should be assigned the value 'Individual'. The asterisk also matches empty cells, so you may wish to include a separate mapping with a blank value in the Source column.
Another advanced feature allows you to arbitrarily add details to all contacts in the spreadsheet. Rather than mapping a value onto an existing column in the spreadsheet, drag a field into a new row in the grid. By specifying a value using the asterisk (as shown above), you can apply it to every contact. This is useful, for example, for applying a particular tag to all contacts imported from the sheet.
Finishing the import process
Once you have finished mapping all columns onto ContactsLaw fields, you can proceed with the rest of the import process.
If you want to apply the same settings to another spreadsheet in future, you can save the mappings you created by clicking the Save button. The next time you import contacts, use the Load button to retrieve the settings for re-use.
Clicking the OK button on the settings window will populate the list of contacts in the import wizard. If the names of the contacts do not look correct at this point, you should clear the list start the process again (taking care to map the columns correctly).
You can then proceed through the import wizard. Depending on the quality and completeness of the data in the spreadsheet, you may have to address warnings and problems interactively; a common problem is when the character casing of values in the spreadsheet does not match what ContactsLaw uses. The wizard may also find matches for existing contacts, which must be resolved by the user.
At the conclusion of the wizard, the contacts will be created and can be used immediately in other parts of the application.